Set your defaults

A comment I’ve heard over and over is: “This is how my RAW file looks, straight out of the camera.”  Well, that’s not exactly a true statement.  You cannot see a RAW file; after all, it is just raw data, ones and zeros.  What you do see on your computer is how the file has been rendered with your particular RAW file conversion software, using whatever the default starting parameters are in that software.  In my mind, this suggests that it would be wise to take the time to make those starting points, those default settings, as you wish them to be.  This can easily be done in both Lightroom and Adobe Camera Raw (which share the exact same RAW conversion engine).

Open a RAW image that has not been worked on.  The settings you see in Lightroom’s Develop module, or in Camera Raw, are Adobe’s default starting points.  Now make any changes you wish to use as your personal default starting points.  Don’t try to totally process the image; you are just changing the starting points.  For example, you might want your images to always open with a certain white balance, or with a certain capture sharpening applied, or with some added vibrance and clarity, or with a particular camera profile (Adobe Standard, Camera Neutral, Camera Landscape, etc.)  These are your choices, and they are just starting points, nothing more.  If you seem to be continually adding a small amount of vibrance to all your images, why not just make that setting a default?

Once you’ve made your choices, the next step is:

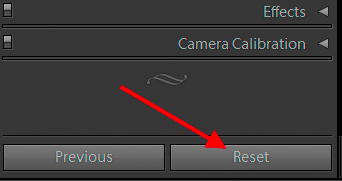
In Lightroom’s Develop module, hold down the Alt/Option key and the “Reset” button at the bottom on the Develop panel becomes a “Set Default” button.  Click it, and say OK.

In Adobe Camera Raw, click on the corner of any panel to get the dropdown menu and select “Save new camera raw defaults.”

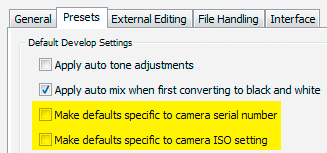
You can have different default starting points for each camera model you own, or each individual camera by serial number, or even by ISO settings for each camera.  Make these selections in Lightroom’s or Adobe Camera Raw’s Preferences.  For example, from Lightroom:

Just remember you are tailoring the starting points of the RAW conversion procedure.  You must still make decisions as to how you want to process each indivual image file.

K25 Film

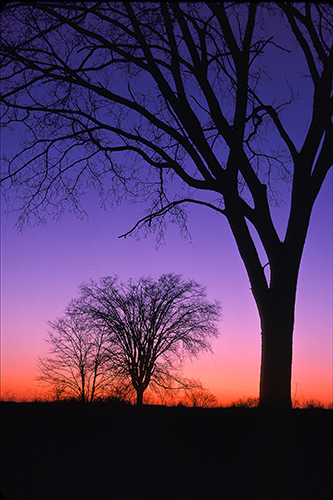
While going through some old slides — yes, slides…you remember those little film snippets? — I came across this 1982 Kodachrome 25 image of American elms, taken on a winter twilight.  For all you youngsters out there this was an ISO 25 film, and was recognized as one of the sharpest, finest grained films around.  This piece of film, or one of the duplicate frames I shot on location, was professionally scanned when I first stared using Photoshop in early 1994.

American elms at winter twilight, K25.

American elms at winter twilight, K25.

But today when I inspect the scanned image at 100%…well, it is a sharp film but look at the grain.

Kodachrome 25, 100% crop.

Kodachrome 25, 100% crop.

Times have certainly changed.  With my current cameras I routinely use ISOs five or six stops higher, and see less noise than the grain showing in this K25 image.  Of course, back when I started, high-speed Ektachrome was all of ISO 160, with special push processing available to get to 400.  I have to say it, I don’t miss using film.

My Menu

One of the features of the newer cameras that I really like is the option to set up a personal menu list of the functions I might want to change during a shoot.  The “My Menu” feature offers the equivalent of bookmarks in a browser, yielding a quick shortcut rather than a longer search.

So what items do I have in “my” menu?  I have the same choices selected in both my Nikon D4 and my D800E, in the same order:

  • Virtual horizon
  • Exposure delay mode
  • Monitor brightness
  • AF activation
  • Multiple exposure mode
  • Long exposure NR
  • AF fine tune
  • Lock mirror up for cleaning

The Virtual horizon choice is for the LCD on the back of the camera.  I have the function button on both cameras set to display the virtual horizon in the viewfinder.

Exposure delay mode locks the mirror up, and allows me to choose a 3 second delay before the shutter trips.

I use monitor brightness to increase the LCD brightness when I’m working in direct sunlight, making it easier to view the LCD.  I much prefer this over using the default “auto brightness” setting.

AF-activation.  While I normally use the back AF-ON button, there are a few times I want to have AF activation on the shutter button.

Multiple exposure mode and Long exposure NR are self-explanatory.

AF fine tune and Lock mirror up for cleaning are rarely used, but it’s more convenient for me to have them listed here.

I haven’t used the image crop mode feature on my D4, and don’t see myself ever doing so.  The D800E is another story.  For landscape work I want the full sensor available, but for wildlife work cropping in-camera (especially the 1.2 crop more) yields plenty of pixels, while reducing file size slightly (which clears the buffer a bit faster).  I could have added image area to my menu choices, but there is an easier way.  I have custom function F6 set so that the AF-L/AE-L  button, when used with the command dial, cycles through the image crop modes.  I can change image area without looking away from the viewfinder.  In fact, this custom setting allows me to choose which crop modes to include and since I don’t care about the 5:4 crop I have it excluded.  Just in passing I also have custom function A5 (AF point illumination) set to “off,” which masks the viewfinder when a crop mode is used.  If A5 is “on,” crop lines are added to the finder image, which gets a bit confusing as I have custom function A6 set to show the viewfinder grid display.  I do wish the camera allowed me to use both the mask overlay and the AF point illumination.

And one “don’t need a menu at all”  feature deserves a special compliment:  being able to activate Auto ISO by holding down the ISO button and turning the command dial.  Bravo!

Menu Please

During photo workshops and tours I often hear this comment from a client:  “My camera doesn’t have that feature.”  When I take their camera and work through the menu choices, nine times out of ten the statement turns out to be not true.  If you want to get the most from your camera, I strongly suggest that you sit down and carefully go through each and every menu offering, including all sub-menus, and tailor the camera to your exact preferences.  If a menu item is not clear, look it up in the camera manual.  You do carry that with you, right?  I have manuals for my current Nikons with me at all times, as I have PDF copies (free to download from Nikon’s web site) on both my smartphone and my Kindle.  Since I’ve used Nikons my entire professional career (and that’s more than 40 years now!), I can usually solve problems without looking for answers, but as the cameras have become more sophisticated the manuals are now an absolute necessity.  Of course, sometimes camera manuals are not so easy to understand.  Then it’s Google to the rescue.  Type in your camera problem, and most likely you’ll find a solution.

Some Changes

Hello, and welcome to the new version of my website.

I’ll be posting some images, and offering some tips and techniques as to taking photos and processing them with Lightroom and Photoshop. Given my travel schedule, I won’t be posting every day but I’ll certainly try to make this blog a bit more interesting than reading a tax form.

John