Category Archives: Software

New Camera…Cannot Open RAW Files

Almost every time a new Nikon camera is introduced, I receive the same email: “I just bought the newest Nikon, but I cannot open the RAW files in either Lightroom or Photoshop.  These programs worked perfectly with my old camera.  Is my new camera defective?”

This past week alone I got five such emails concerning the D750.

When you purchase any camera you should check with Adobe as to which camera bodies are currently supported, given the versions of the Adobe software you own.  Go to this web site:  http://helpx.adobe.com/creative-suite/kb/camera-raw-plug-supported-cameras.html.

The other email I constantly receive is: “I have Lightroom 3 and Photoshop CS4, but cannot open the RAW files from the new Nikon I just purchased.”

Well, your new Nikon did not even exist when those old versions of software were created.  Your options are to either upgrade the software (in my opinion the better option as newer versions of software generally offer more), or see if you can use the free Adobe DNG converter with your new camera.  Find out here:  http://helpx.adobe.com/photoshop/camera-raw.html#dng.

You might discover you need to upgrade your computer.  Another typical email I get: “I’m using Windows XP, but Lightroom 5 won’t work.”  Really?  Look at the operating system requirements for Lightroom 5:  Windows 7 with Service Pack 1 or newer.  XP is, in computer terms, ancient history.

So now I’m waiting for another email to arrive: “I use a typewriter, but I can’t seem to load Microsoft Word.”

I have no idea how to answer that.

HDR (a different way)

I’m not a fan of HDR images.  Well, let me clarify that statement.  I’m not a fan of the all-too-typical HDR images I see.  Over-saturated cartoonish colors, with halos around edges, and lots of noise.  No thanks.

But there is a quick and easy way to create naturalistic looking extended dynamic range images, by using Photoshop’s HDR Pro to first create a 32-bit file, and then using the adjustments in either Camera Raw or Lightroom’s Develop module to work on that file.  To be honest, I thought many photographers already knew this trick, but on a recent Van Os Photo Safari which I was leading I discovered that very few of the participants seemed aware of it.  So…OK, here goes, step-by-step.

  • Shoot a series of images varying the exposure by one or two stops between shots, just as you would for any HDR composite.
  • In either Lightroom or Camera Raw make whatever basic adjustments are necessary.
  • Select all the images, and open all in HDR Pro.  From Lightroom: Photo > Edit In > Merge to HDR Pro in Photoshop.  From Bridge: Tools > Photoshop > Merge to HDR Pro.
  • In HDR Pro, check Remove ghosts, and select 32 Bit as the Mode.

  • And now you have a choice to make.  If you normally work in Camera Raw, check the box to Complete Toning in Adobe Camera Raw.  If you normally work in Lightroom, just click OK at the bottom of HDR Pro, and then save the file as a TIFF.  Make sure you save it as a 32-bit file.

  • If you’re going the Lightroom route, import this new file into Lightroom, and then open it in the Develop module.
  •  With either method,  process the file in Camera Raw or Lightroom as you normally do… but check out the range of the Exposure slider.  It’s now plus or minus 10 stops either way, double what it was before.  Wow!  That’s a 20 stop exposure range, definitely an extended dynamic range.

Lightroom 5: Visualize Spots

Lightroom 5 introduced an extremely useful feature called Visualize Spots.  However, during my recent workshops I’ve discovered that quite a number of Lightroom users are not aware of it.  Visualize Spots does exactly as its name suggests; it shows you all the dust spots on your image, including many that you might otherwise miss.

In the Develop module, make sure the Toolbar is visible below the image (tap the T key to toggle the toolbar on or off), and set your image view at 100%, or 1:1.

Navigate to the upper left corner of the image (hold down the spacebar, and drag the image), then activate the Spot Tool.  The Visualize Spots checkbox now appears on the Toolbar, at the bottom left.

The image changes to black and while, and all those dust bunnies show up.  Move the Visualize Spots slider to increase or decrease the sensitivity, and start spotting.

Page Down (PC: PgDn; Mac: Function + down arrow) moves the image down by exactly one screen view.  When the bottom of the image is reached, do Page Down again, and the screen image moves over and up to the top.  Keep doing Page Down, until you’ve covered the entire image.  This Page Down trick means you’ll never miss any section of the image.

FILE NAMES

When it comes to image file names, there seems to be two opposing schools.  There is one group of photographers who are happy with the file names created by the camera, and, at the opposite extreme, another group that wants to include all information possible in the file name.  The first group has files with names such as DSC8531.nef, while the second group might have an image named Eddie_in_his_pirate_costume_2013Halloween5375.jpg (and yes, that is a actual file name I saw last week, and which prompted this blog post).

I would suggest a middle ground, a simple file naming convention that precludes ever having two files with the same name (a potential problem for the first group), while eliminating the incredibly lengthy and unwieldy file names of the second group.

I rename my files by the date the image was taken (metadata automatically recorded by your camera, so long as you set the clock in your camera to the correct local time).  My convention is YYMMDD + the filename and number created by the camera.  Nikon allows setting a three digit filename in Shooting Menu > File Naming, so I set my Nikon D4 camera as D4N.  Then I made and saved a file renaming template in Lightroom (and a similar template in Downloader Pro, which I use when I have hundreds of files to download).

By using the template, a file from my D4 downloads along the lines of 131206_D4N_2764.nef.  By using YYMMDD all my files will automatically be in chronological order, and unless I shoot more than 10,000 images in one day with that particular camera, I’ll never have the problem of duplicate file names.

For more about file organization see my October 1, 2012, blog piece on File Storage.

Adobe Creative Cloud

If you’re a Photoshop user, you’ve undoubtedly heard about the Adobe announcement that from now on all new versions of Photoshop will be by subscription only.  You download the software, and it resides on your computer, but if you don’t pay the subscription fee the software deactivates.  Potentially this means that you might not be able to access your images.   Subscribe for a while, save a master layered image, and only by paying the subscription fee can you get back in to work with that layered file.  Yes, it’s on your computer, but of no use.  In short, it seems to me you have two choices:  (1) pay the subscription fee, and keep paying it forever, even with price increases; or (2) stick with PS CS6, the current version which you can purchase outright.  The problem with (2) is what happens if you buy a new camera, not supported by CS6, or get a new computer with a new operating system on which CS6 will not run?  You could keep your current gear, but I for one am certainly not at the point of saying that the cameras and computers I presently own are my final cameras and computers.

Adobe has different pricing schemes, and for those who use multiple Adobe products the cost per month makes some sense.  But I don’t.  I use Photoshop, and occasionally InDesign, and the latter is an older version which I have no plans to upgrade.

Like many, I’m not happy about Adobe’s decision.

But…there is a small glimmer of hope, especially if you’re a Lightroom user.  Lightroom was designed specifically for photographers, while Photoshop was not.  Here’s a long forum piece which in my opinion is well worth a read:

http://www.luminous-landscape.com/forum/index.php?topic=78240.0

In case you don’t know the players, Thomas Knoll is the original creator of Photoshop, Eric Chan is the chief engineer on Adobe Camera Raw, and Jeff Schewe is a photographer/developer closely connected to Adobe.


10 Photoshop Tips

1.  To tone down the whites in an image, select them using Color Range.  Add any adjustment layer, and change the layer blending mode to either Multiply or the slightly stronger Linear Burn.  Then drop the layer opacity to taste.

2.  When shooting frames for a panoramic, manually setting camera exposure is more precise than using an autoexposure mode.  Use the middle of the panoramic scene to set the base exposure.  If you’re shooting RAW files, you can leave white balance (WB) set to Auto.  When processing the files in Adobe Camera Raw, or Lightroom’s Develop module, select one image and drag the WB slider from the “as shot” position to a distinct number.  Now sync all the other frames to that WB.

3.  Make a preset to rename your files in Bridge or Lightroom based upon the capture date.  When you travel, reset the clock in your camera to the local time zone.  This way, all your image captures will match up with your itinerary and there will be no confusion as to location.  Just remember to reset the clock when you get home.

4.  Photoshop’s Ctrl/Command+Z undoes the last step you’ve taken.  But using it immediately a second time simply undoes the undo you just made.  To step backward more than once, use Alt/Option+Ctrl/Command+Z.

5.  When preparing an image for printing, as the final step add a 3 pixel black hairline around the perimeter to define the edge.  Three easy ways to do this:

  • Select the entire image, Ctrl/Command+A.  Then do Edit > Stroke, and set pixels to 3, the color to black, and the location to Inside.
  • With the image layer unlocked, add a Layer Style, Layer > Layer Style > Stroke (or click on the fx icon at the bottom of the Layers Palette).  Set pixels to 3, Position to Inside, and color to black.
  • Increase the canvas size, Image > Canvas Size.  Select pixels for the unit of measurement, 3 for the number of pixels, black for the color, check the Relative box, and make sure the middle square is the anchor position

6.  Opening several similar images as layers in Photoshop (from either Bridge or Lightroom) aligns the outer dimensions of the images.  To align the contents, select all the layers, and then do Edit > Auto-Align Layers.

7.  Make a brush to add your name and copyright to images.  Make a new white document no larger than 2500 pixels long dimension.  Add the copyright symbol and your name.  Then do Edit > Define Brush Preset.  For a signature brush, write your name on white paper using a black marker, photograph it (jpeg, small, fine), and size the image to no larger than 2500 pixels.  Using Image > Adjustments > Levels clip the image to pure white and pure black.  Save as a brush, Edit > Define Brush Preset.  If you use either of these brushes on a new layer, you can add Layer Styles (drop shadow, etc.) to that layer.

8.  Caps Lock toggles the cursor display — for example, from standard to precise.

9.  Use the often overlooked Image Processor (from Bridge: Tools > Photoshop > Image Processor) to quickly create new file types.  Select the images, choose an output location, select the file type you want, specify the quality and size, and click Run.

10.  When making selections, remember that the “marching ants” only show pixels that are at least 50% selected.  Outside of the “ants” are pixels that are also selected, just at a lesser amount.


These tips originally appeared as part of an article I wrote for Photoshop World magazine.

Lightroom & Camera Raw

I recently received an email with a question about processing an image in Lightroom.  When the same image was opened from Bridge into Camera Raw, none of the Lightroom work was applied.  This question has come up before, and there seems to be quite a bit of confusion over what is happening.

Any time you make a change to an image in Lightroom, that information is saved only in Lightroom’s catalog.  It’s not part of the file.  The solution is simple:  after working on a photo in Lightroom, save the final metatdata settings to file (and all edits in Lightroom are metadata edits).  Select the photo or photos you have worked on, and do Ctrl/Command + S.  You can now open an image from Bridge into Camera Raw or Photoshop, and they can see what you’ve done in Lightroom.

You could select Automatically write changes into XMP in Lightroom’s Catalog Settings, but I suggest not to do so, as this has to record every edit you make.  Move any slider from 0 to 1, and then move it to 2, then back to 1, and finally back to 0, and all four of these moves have to be recorded…but in terms of the image nothing at all has happened.  Ctrl/Command +S (menu item: Save metadata to file) saves the summation, which is the only thing that matters.

Suppose you work on an image in Lightroom, and then choose “edit in Photoshop” to finalize the image.  When you’re finished working in Photoshop you select either “save” or “save as,” and the image is returned into Lightroom’s catalog and all is happy.  Lightroom knows what you have done in Photoshop.

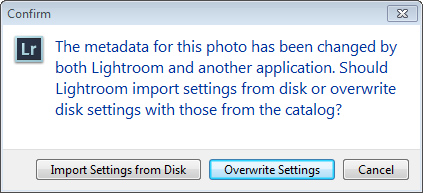
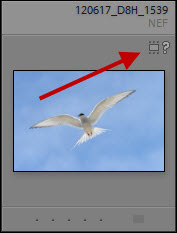
But what happens when you do not start from Lightroom?  Use Bridge to open an image that is already in Lightroom’s catalog, make some edits in either Camera Raw or Photoshop, and then save the image…but now Lightroom doesn’t know what you have done.  When you next open Lightroom, the image will be tagged with a small badge, indicating that settings have been changed outside of Lightroom.

Click on the badge, and this message box appears:

So, what do you want to do?   If you want Lightoom to show what you did in Camera Raw or Photoshop, click on Import Setting from Disk.  If you want to to keep the Lightroom settings as they were, click Overwrite Settings.

Lightroom travel catalog

When I travel I make a new Lightroom catalog for that trip on my laptop.  Image files are downloaded and added by date, into a folder with the month and shoot name, such as 09 Alaska (September, Alaska).  I discussed this in a previous blog so please refer back a few entries.  All my images from this particular trip will be within this folder.  Every day I flag any image files I work on, then save metadata to file (select by flag, then Ctrl/Command+S).  And every day I copy all that day’s shoot from my laptop to two external USB powered hard drives, so that by the end of the trip I have three duplicate copies of all my images. I also have Lightroom set to automatically backup its catalog to the external drives every day.

When I get home I export the trip catalog to one of the small USB drives that has all the trip images.  I plug this drive into a USB port on my desktop computer, and copy the folder with the image files over to the correct date location on my main hard drive array, the tower JBOD I discussed earlier.  Then I import the trip catalog into my master Lightroom catalog.  I disconnect the small USB drive, point Lightroom to the location of the trip’s folder of images on the JBOD, and I’m done.   My backup software kicks in, and automatically backs up the new images.

When I’m positive that all the image files are actually on my main system, I wipe the trip catalog off my laptop, reformat the small external USB drives, and I’m good-to-go on my next adventure.


Copy, don’t move

Let me follow up a bit on my previous blog about “lost files” in Lightroom.

A possible problem with moving files and folders, whether by dragging and dropping in Lightroom, or by using the Move command in Explorer or the Finder, is that Move deletes the file or folder from the previous location after completing the move.  Call me paranoid, but what if something happens as the files are being moved?  The deleted version of the file or folder is not in the trash; it’s just gone.  While I’ve never had any problem, I do know one person who, while moving several large folders of images, accidentally bumped a bus-powered USB drive and disconnected it.  The folders — and all the images — were gone, never to be found again.  For relocating folders, I use the Copy command outside of Lightroom, and then re-link the missing folders inside Lightroom as described in my earlier blog.

Lightroom lost my pictures

At every workshop I teach, someone always complains that “Lightroom lost my pictures.”  Well, not exactly true.  There are no pictures actually stored in Lightroom.  Lightroom is a database of the last known location for those pictures.  Remember library card catalogs?  They told you where a book was located on a certain shelf.  But if someone moved the book, how was the card catalog to know?  It’s the same with Lightroom.

If you move an image file outside of Lightroom — using your operating system’s tools (Move or Copy) — Lightroom has no idea what you have done.  There is no way that it can know.

Consequently, the next time you look in Lightroom for that image there will be a ? thumbnail badge.

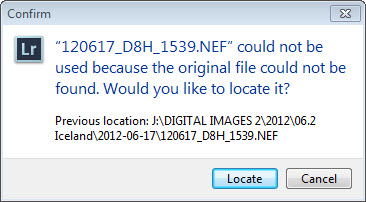
Click on that badge and a dialogue box opens.

Click on the Locate button and navigate to wherever you moved the image.  If you have several missing images and they are all from the same folder, locating one will automatically locate all the others.  If they are from multiple folders, you’ll have to locate each individual image.

If you have used your operating system to move a folder of images, the folder in Lightroom will have the ? thumbnail badge.

Right-click on the ? badge, and you get this option:

 Select Find Missing Folder, and either Window’s Explorer or Mac’s Finder will open.  Navigate to the missing folder and select it.  Lightroom will now be reconnected to the folder, and the ? badge will be removed from both the folder and the images within that folder.