Category Archives: Gear

Some thoughts on the D850

So, is the Nikon D850 the only camera you need?

In my opinion the answer to this question is the same as the answer to most photographic questions:  it all depends.  I do think the D850 is a great camera.  And if I could only own one current camera, it would be my choice.  But should it be your choice?  In my opinion your decision should take in hand these questions:

  • What do you do with your photographs?  By far, most images taken are either shown on a smart phone or tablet, or posted on the Web.  At these image sizes any camera works great, witness the fact that the vast majority of all images shot today were taken with a phone.
  • Do you really need all those megapixels?  Do you make large prints?  Really?  Do you make prints at all?  Do you own the computer power to process large files (and a D850 file with a few layers in Photoshop quickly swells to over a GB).
  • Are you primarily a bird and wildlife photographer?  The D5 definitely yields better high ISO performance at ISO 6400 and up, while both the D5 and D500 offer faster frame rates.  Sure, at roughly $950 you can soup up the D850 to 9 fps, but you end up with a camera that is slightly larger, and slightly heavier, than the D5.  Are weight and size considerations for you?
  • Do you see the D850 offering you more cropping possibilities?  The D500 is basically the same pixel density as the D850 at a considerably lower price.  If you’re thinking about the D850 in order to crop heavily, perhaps the D500 makes more sense, especially when you could put the difference in price toward additional lenses, or a better tripod, or a photo trip.
  • Can you give some specific reasons why getting a D850 will improve your photography?  What will it allow you to do that you cannot do with your present equipment?
  • And of course, can you afford the purchase price of the D850, along with new cards or computer drives or other additional expenses?

OK, I guess there is one more point than comes into play, which certainly did for me when I ordered the camera.  I rationalized that at my age I deserved a treat.  I’m not so young anymore (in all honesty, I’m in the “duffer” or “geezer” or “old guy” category), I’m not a car fanatic (although I love my truck and camper), nor am I a druggie or drunkard (although I do like a single malt in the evening).  So I figured I could indulge myself.  Yep, a rationalization for sure.  But I definitely like the D850!

Nikon D850 Focus Shift

I’ve been using the Nikon D850 since October and can say I’m very impressed with the camera, particularly for my landscape work.  Two features in particular stand out:

  1. The “silent shutter” mode in Live View.  I should mention that I use Live View a lot when I’m photographing static subjects, and it’s a given that I’m working from a sturdy tripod.  In “silent shutter” the shutter is fully electronic — hence no shutter curtain movement at all — and of course when in Live View the mirror is up.  Eliminating the mechanical shutter and eliminating any mirror movement means eliminating two sources of possible vibration.  Turn on “silent live view photography” in the Photo Shooting menu, and select Mode 1 which gives a full-resolution, non-cropped image.
  2. The “focus shift shooting” option, also found in the Photo Shooting menu.  Here the camera takes a series of shots, slightly changing the focus point for each frame.  The resulting images can be “stacked” as a composite, thus increasing the in-focus area of the final photo.  This “stacking” must be accomplished with software in post-production; it’s not done by the camera.  The individual photos can be taken at a lens’s sharpest aperture, around f/5.6 or f/8, eliminating diffraction problems while yielding greater depth of field.

Turning on “focus shift shooting” gives you a number of choices:

  • The number of shots (up to 300)
  • The focus step width (1 through 10, undefined what these actually mean)
  • The interval until the next shot (between 0 and 30 seconds)
  • Exposure smoothing
  • Silent photography
  • Starting storage folder

Here are my choices, for landscape work:

  • Number of shots:  Set this to around 50, as the number really doesn’t matter.  The camera will stop with the lens focusing ring hits the end of its travel.  I have my camera set at 50 and most of the time the actual number of usable frames is between 5 and 10.  FYI, you will often find some extra frames where the camera has gone before the far point in your composition, so nothing is in sharp focus.  No big deal, just delete these frames when you see them later on your computer.
  • Focus step width:  I have mine set at 2, as I want to work at those prime apertures on my lenses, so I want to make sure each frame’s depth of field overlaps with that of the preceding or following frame.
  • The interval until the next shot:  I have this at 0.  And VR is “off” on the lens in use.
  • Exposure smoothing:  Off, as I do all my focus stacks in manual exposure so that all the frames already match in total exposure.
  • Silent photography:  On.
  • Starting storage folder:  I don’t use this.

So here is the easiest way I know to work.  Leave “silent shutter in Live View” turned on.  Add “focus shift shooting” to My Menu, and position it as the top most listing.  In the Custom Settings menu, Custom Control Assignment (choice number F1 in Custom Settings), set the Fn2 button on the camera rear to “access the top item in My Menu.”

In the field, turn on Live View, compose your image, set the exposure, and focus on the nearest past of the frame.  Press Fn2, select Start, and the camera begins shooting in silent mode.  When you’ve done this once, if you don’t need to change any options, the next time you can just press Fn2 and then OK twice.

Just to cover yourself, shoot several stacks of any one composition.  How to tell where each stack beings?  Wave your fingers in front of the lens and shoot one frame in Live View before you push Fn2.  Important reminder (and I speak from experience here):  remember to refocus on the closest point for each stack.

OK, now to the actual stacking.   I’m assuming you’re shooting RAW files, and you are, right?  You could use Photoshop.  If so, you need to first process the individual images and then open them as layers in Photoshop.  Select all the layers and do Edit > Auto align followed by Edit > Auto blend.  This method works OK, but there are two problems:  the final file is no longer a RAW file, and with complex subjects you will probably discover a number of stacking artifacts (blurry areas, that is).

In my opinion, a better choice is to use a separate stacking program and I would recommend Helicon Focus.  Google for a discount code to knock the price down about 20%.  Helicon works directly from Lightroom, and if you install Adobe’s free DNG Converter, Helicon has a mode called Raw In – DNG Out.  You export the selected images from Lightroom to Helicon in their original RAW state.  I’ve found that almost all the time running Helicon at its default settings works fine.  Most of the time Helicon’s rendering intent mode B is my choice.  If it leaves artifacts I try mode C.  When Helicon finishes, the resulting file can be saved right back into Lightroom as a DNG, and processed to taste as you would any RAW file.

Tilt

A regular lens on a DSLR can be focused near or far, but the axis of the lens is always at a right angle to the sensor.  The plane of focus (the slice of space that is in sharp focus) is always parallel to the sensor in the camera.  No matter what, there is only one plane that is in absolute sharp focus, but apparent sharpness can be increased by using a small aperture to increase depth of field.  With a regular lens, if you need more of the image in a single frame to appear in focus your only choice is to shoot at the smaller apertures.  This has two major drawbacks: (1) smaller apertures mean slower shutter speeds.  Try to photograph a field of flowers where you need f/22 for enough depth of field, but f/22 in turn means a shutter speed of 1/15 second, and that’s not fast enough to stop wind movement.  Upping the ISO means the probability of increased noise.  And (2) while you gain depth of field, small apertures introduce diffraction problems, reducing sharpness.  Current high megapixel cameras, with their ability of record small detail, will all too readily show diffraction.

The solution is to reposition the plane of focus, to re-designate where it lies, and in order to do this you need a tilt/shift lens, which allows the front part of the lens to be moved compared to the sensor plane.  The lens plane and the sensor plane no longer have to be parallel, but can be angled or displaced relative to each other.

Now, a bit of theory.  Imagine three planes extending infinitely: the plane of the sensor, the plane of the subject (the part of the image where you want focus to fall), and the plane of the lens.  With a standard lens only two of these planes can ever have a common intersection, because the plane of focus is always parallel to the sensor.  But if you can tilt the lens all three planes can meet in a common intersection and a photographic miracle happens as now the focus plane has been repositioned.

You will often hear that using a tilt creates more depth of field.  Not true.  What a tilt movement does is reposition the plane of focus so that it no longer lies parallel to the sensor.  This in turn creates a wedge-shaped depth of field which increases further away from the camera.  By repositioning the plane of focus, by tilting the lens, part of the image closer to the camera will be in focus and part of the image further away will be in focus simultaneously.  Depth of field is always on either side of the plane of focus, with less depth of field at close focus distances and more depth of field at far focus distances, hence a wedge shape.  A really common belief is that using tilt movement will bring everything in a photo into sharp focus.  Sorry, not true; you still need to stop down.  The amount of tilt does not control depth of field, the aperture choice does that.

First you need to decide where you want to position the plane of focus.  You always tilt the lens TOWARDS this plane, no matter the orientation of the camera body or the subject.  But how do you figure our how much to tilt?  How do you actually set focus?  Setting a Nikon or Canon tilt movement is not the same as how you would work a tilt movement with a view camera due to the differences in the rotational point of the DSLR lenses.  A lot of what you read on the Web applies mostly to view camera work.

So…step by step, here is what I do.

  1. Decide on the most important plane of my subject, where I want to position the focus.
  2. Chose a near point and a far point in this plane of focus.
  3. Set the tilt on my lens to zero (no tilt at all).
  4. Focus on the near point.
  5. Without refocusing, slowly tilt toward the far point until it appears in sharpest focus, and lock the tilt movement.  The near point is now out of focus.
  6. Without changing the tilt, refocus on the near point.  The far point is now out of focus.
  7. Unlock the tilt movement, and slowly move the tilt in the opposite direction than done earlier until the far point appears in sharpest focus.  De-tilting, if you will.
  8. Repeat steps 5, 6, and 7 if necessary until both near and far appear in focus.
  9. Lock the tilt movement of the lens, and trim overall focus if needed.
  10. Select the aperture needed for depth of field.

The two biggest problems I see when people first use tilt/shift lenses are (1) working way too fast — using a tilt/shift lens should be slow and methodical — and (2) dialing in far more tilt than needed.

MY MISTAKE

Every once in awhile we all make dumb mistakes…even though we know better.  Recently I was in Iceland and was using my 24-70mm f/2.8 Nikon lens ( the “old” non-VR version).  I’ve owned this lens ever since it came out but I rarely carry it any more, as I prefer the 24-120mm f/4 for travel.  I had the f/2.8 lens with me in Iceland on the off chance I might need that faster aperture for some night photos.

I’ve known for many years that the 24-70mm has a minor flaw that only shows up when the lens is used in a unique non-typical photographic situation.  It has a light leak, through the little plastic window that shows the focusing distance.  This leak affects the image only when there is a strong light source directly hitting the window coupled with a long exposure time, a combination that most photographers do not experience.  How long have I known about this?  Well, just Google “light leak Nikon 24-70mm” and you’ll find links going back to 2010.

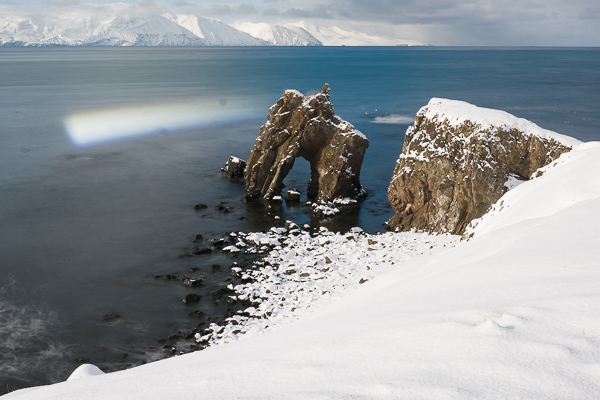
The solution is really simple: cover the plastic window with a small bit of gaffer’s tape, which is exactly what I did way back when.  But at some point in time, for some reason I don’t recall, I removed that tape and forgot all about the possibility of a problem.  And then in Iceland I used the lens in the exact “not typical” situation: strong sunlight hitting the window coupled with a 10-stop ND filter to slow the shutter speed to 15 seconds at f/14 and ISO 64.  Here’s the result:

Nikon 24-70mm light leak.

I use Live View a lot for landscape work, so I immediately saw the light streak across the frame.  Hello John, remember this?  I keep a few strips of gaffer’s tape stuck on the inside of my camera pack, so I ripped off a small section and covered the little window.  My first rule of life: don’t be dumb.

TRIPOD SNOWSHOES

A few days from now I’ll be at Crater Lake National Park for some winter landscape work.  Crater Lake is a reasonably short drive for me, so I can easily coordinate the timing of my trip with the weather.  I want fresh snowfall and no wind.  One thing is sure: as usual for this time of year there is already a lot of snow on the ground.  A quick online check tells me that as of today there is 72 inches of snow at the headquarters building and a lot more at higher elevations.  I’ll need my snowshoes so I don’t disappear into the drifts, but what about my tripod?  How do I keep it from sinking into the snow?

While you can purchase readymade tripod snowshoes, it’s quite easy to make your own set for just a few dollars.  I did this years ago, and the first ones I made still work just fine.  Head to your local home improvement store and purchase the following:

  • Three slip-on furniture-leg tips (also known as crutch tips) in a size just large enough to slip snugly over your tripod feet.
  • Three one-inch long bolts, the nuts for them, and six flat washers that fit the bolts.
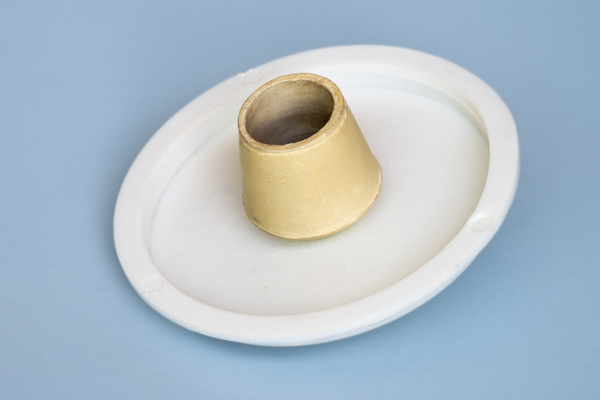
  • Three flat plastic test caps (look in the plastic pipe section).  Mine are for 4-inch pipe and cost around $1 each.

Drill a hole through the center of each leg tip, and through the middle of each plastic test cap.  Take a bolt, add a washer, and thread it through the hole in the test cap, then add a second washer and nut and tighten.  That’s all there is to it.  Make three of these, shove them over the tripod feet, and you’re good to go.  Just as you will sink a little into the snow when you’re wearing snowshoes, your tripod will also, but it won’t sink out of sight in powder snow as it would otherwise.  In deep snow start with the tripod legs less than fully spread.  As you push the tripod down into the snow, the snow itself will force the legs apart.

A well-used tripod snowshoe.

Nikon D500

In the comments to my previous post several persons asked how I like the D500, now that I’ve been using it for some time.  So here goes….  My quick and easy answer: it’s the best “crop” body that Nikon has produced, particularly if you’re a wildlife shooter who wants the extra “reach.”

The D500 specs are readily available so I won’t repeat them here, but in my opinion there are some standout points:

  • Very fast AF.
  • 10 fps second motor drive rate.
  • 20.9 megapixels (which is more than the D810 when the D810 is used in the equivalent DX mode).  The D500 also offers just over 12 megapixels when used in its 1.3 crop mode.  I mention this point as the result is about a 2X view compared to a “full frame” camera while the resulting file size is roughly the same as from a D3 or D300.  Times have definitely changed.
  • Expanded buffer.  The buffer size depends on the card in use, but it’s roughly 40~45 RAW frames with a fast SD card, and 200 shots with an XQD.  Anyone remember the D100?  I think its buffer was about 3 RAW shots.
  • A minor but very handy feature:  button illumination for low light conditions.  To use, pull the Power Switch to the right, to the light bulb icon.

I try to keep the ISO at 1600 or lower, but I will go to 3200 knowing that the files will need some extra noise reduction help.  Of course, if there is a chance to grab a shot of Bigfoot, or if you’re only posting to the Web, then the sky’s the limit.  For my purposes, if I really need high ISOs I’ll switch to my D5.

Make sure to turn airplane mode ON in the setup menu in order to conserve battery power, otherwise the camera will continuously search for a Wi-Fi connection.

Forget about using off-brand batteries, or the older Nikon EN-EL 15 ones marked Li-on01.  In case you missed the announcement, Nikon will exchange these for new Li-io20 batteries at no cost, so long as you include a copy of your D500 sales slip.

And I’ve become a fan of using the Info button to modify settings…or perhaps the larger type on the LCD screen is simply easier for my old eyes to read.  What I really like is being able to change fill flash levels when I’m using a Better Beamer equipped flash on a RRS or Wimberley bracket.  With the flash active, touch the Info button, hold down the “minus” button the left side of the LCD, and a “flash mode/compensation” option appears, which includes indicators of which command dial to turn.  Total control from the camera, no need to reach the flash unit itself.

Am I getting rid of my D810 bodies?  No, not at all.  In my opinion, the D810 is still the best all-around camera there is.  But for action/wildlife the D500 is hard to beat.

For a longer review, I highly recommend you watch Steve Perry’s D500 YouTube video found here:  https://www.youtube.com/watch?v=ComPpr0bniM&t=5s.  For that matter, do yourself a favor and check out all of his videos.

NIKON D5 AUTOMATIC AF FINE-TUNE

Yes, I bought a D5 to use as my action/fast AF/high ISO camera.  My D810 bodies will continue as my landscape/lower ISO cameras.  I’ve had the new D5 all of two days now, but I’m already getting emails about one feature: how to use the automatic AF fine-tune.  OK, so here goes…and to make it work you need to follow these steps precisely.

  • You need a flat target with distinct high contrast printing.
  • Mount your camera on a sturdy tripod, on a hard surface floor, with the target parallel to the camera back.  Have the camera/target distance about 25 times the focal length of the lens you’re using.
  • Turn off VR.
  • Set the AF mode on the camera to AF-S.
  • Have the Movie Record button set to None (in Custom Settings f1)
  • In Custom Settings f2, set the multi-selector center button > shooting mode > reset > select center focus point.
  • Turn on AF fine-tune in the Setup menu, with the default value at 0.  Leave AF fine-tune turned on from now on.
  • Turn on Live View (make sure the Live View selector switch is set to camera, not video), and select the center focus point by pressing the multi-selector center button.
  • Autofocus on the target using either the shutter button or AF-ON button, and make sure the focus box in Live View turns green, indicating that focus has been achieved.
  • Hold down the AF-mode selector and movie-record button simultaneously, and keep them pressed until a message appears on the LCD (this should appear in about two seconds).  Make sure YES is highlighted, then press the OK button.
  • When a second dialog message appears, press OK again.

That’s it.  Easy.  It took more time to write this out than to do the actual process.

And I now have two D4 camera bodies for sale.  Both in great shape, will all the goodies from Nikon.  Make me a reasonable offer for either (or both!).

AUTO ISO IN MANUAL

Many current cameras have a “hidden” autoexposure feature, an option I use quite often when working wildlife.  If your camera has “auto ISO” buried someplace in the menus, you probable can use this feature.

Three choices control exposure:  shutter speed, aperture, and ISO.  We generally lock in two of these, and vary the third.  In aperture priority you select the f/stop and ISO, and the camera sets the shutter speed.  In shutter priority you select the shutter speed and ISO, and the camera sets the f/stop.

With most cameras it’s far easier to change shutter speed and/or aperture than it is to change ISO.  After all, with both Nikon and Canon that’s what the command dials by themselves do as default behavior.

Look in your camera’s menus to see if you have “auto ISO.”  If so, turn it on for this test.  The way auto ISO normally works is that you set a minimum shutter speed and a maximum ISO value.  So long as you’re shooting at that shutter speed or higher, the camera will vary the ISO needed for the situation.  If the light level drops below this range one of two things happens: (a) in aperture priority the shutter speed continues to slow below your preferred minimum, while the highest ISO value is maintained, or (b) in shutter priority, once the aperture is wide open the camera underexposes, usually with some sort of viewfinder warning indicator, but still using the highest ISO.

But here’s the catch for bird and mammal work: setting a minimum shutter speed for wildlife means you’re probably going to choose a fast speed in order to stop any possible action.  What if you intentionally want a slower speed?  At the same time, at any given light level you don’t want to work at any higher ISO than necessary; you always want to use the lowest ISO you can get away with, given the situation.  That fast minimum shutter speed you selected may force you to shoot at a high ISO even in good light.

OK, back to those three variables that control exposure.  Reread that paragraph up above, and you’ll notice that I did not mention the manual exposure mode in which what you set is what you get.  In this exposure mode you have to manually set both the shutter speed and the f/stop.  Now here’s the kicker: if your camera has auto ISO, most likely you can use auto ISO while the camera is in manual mode, and let the camera vary the ISO needed for whatever shutter speed/aperture combination you select.

However — and this is a major “however” — you must know how to work in the manual mode.  I’m always amazed at how many photographers today do not know how to do so.  If you’re not sure, read my June 2015 blog post, and your camera’s manual, and practice.

So, switch to manual exposure mode, and turn on auto ISO.  Set the highest ISO value to whatever maximum ISO you’re comfortable using with that camera.  Set the camera itself to its lowest native ISO.  For Nikon cameras, the “minimum shutter speed” choice in auto ISO does not apply when the camera is in manual mode (and I’m pretty sure this is also true for Canons, but not being a Canon user myself…).

What you have basically done is turn the manual exposure more into an autoexposure one.  You select the f/stop and shutter speed you want, the camera sets the necessary ISO.

But how can you add or subtract the amount of light (for example, in order to reposition the histogram when shooting RAW) if the camera adjusts the ISO for any given shutter speed/aperture combination?  Just as in any autoexposure mode, you use the camera’s autoexposure compensation.  This does not affect the shutter speed or aperture you’ve set; after all, in manual mode what you set is what you get.  Instead, it changes the ISO the camera selects.  Dial in a +1 autoexposure compensation, and the camera raises the ISO by one stop; dial in a -1 compensation, and it drops the ISO by one stop.  Since the camera is in manual mode, the shutter speed and aperture displayed in the viewfinder will not change, but there will be some sort of indicator that exposure compensation is in effect.  You’ll have to pay attention to what you’re doing, and remember to return the compensation back to “zero” when no compensation is needed.  If the light level drops so low that the camera maxes out ISO, your set exposure values will be too low.  Just watch the meter display, which in this case will show underexposure.

Should you use this “auto ISO with manual” mode all the time?  Heavens, no.  As with all modes on your camera, you use what is appropriate to the situation.  I personally find auto ISO in the manual mode extremely useful when I’m working wildlife.

SMALL BOAT, BIG LENS

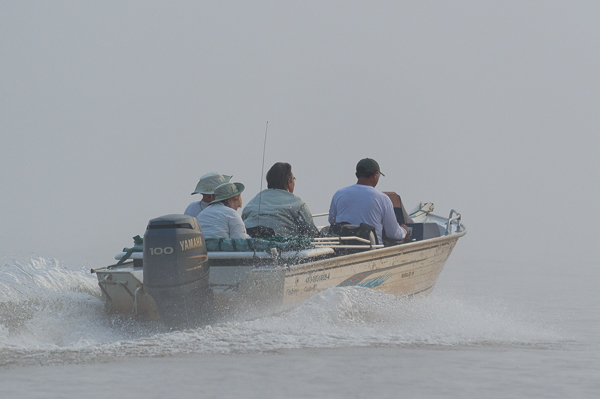
What’s the best way to use a big lens — something like a 500mm or 600mm — when photographing from a small boat?  Here’s the sort of boat I’m talking about.

Handhold that big lens?  Sure, you can get a shot or two off, but handholding a really large lens is almost impossible to do for any length of time.  The minute you relax and lower the lens is exactly the moment you should be shooting.  Set up a tripod?  A tripod is almost impossible to use, if you are in a situation where you cannot move around.  Try this experiment:  sit with your tripod mounted big lens directly in front of you at eye level, as if you were sitting in a small boat.  Now swing the lens hard right, and without changing your body position, try to look through the viewfinder.  Bet you can’t do it.  And if your tripod doesn’t have a centerpost it’s almost impossible to raise or lower the shooting height.  You’re stuck with photographing to your left side at one camera height.  Don’t even try to aim the lens at much of an up angle, unless you want to turn your body into a pretzel.

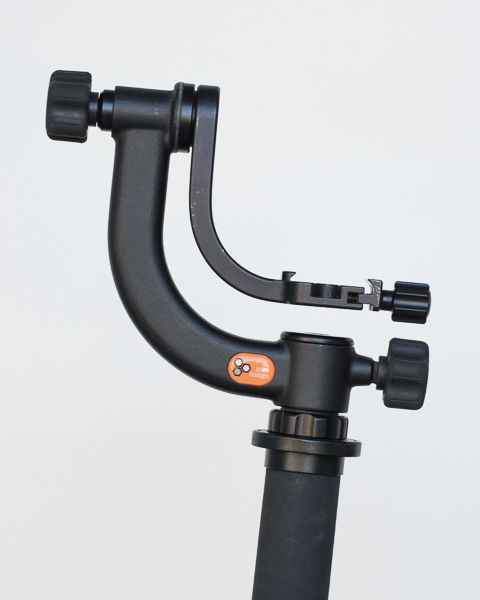
My solution may seem a bit strange at first, but it works really great.  Use a monopod with a gimbal head mounted.  My preferred setup is the Manfrotto 681B monopod (the flip-locks make it easy to lengthen or shorten the monopod using just one hand, while you support the camera/lens with the other) plus the Jobu Jr 3 Deluxe gimbal head (the smallest and lightest gimbal, ideal for travel).

I’ve used this combination a lot from small boats, and also from open sided safari vehicles, while working with my Nikon 500mm and both the “old” Nikon 600mm G and my “new” Nikon 600mm FL lens.  Balance the lens in the head as you would whenever you use a gimbal.  Lock the gimbal’s horizontal rotation, as you can just turn the monopod from side to side.  Leave both the swing arm, and the lens’s tripod collar, unlocked.  You can now easily aim the lens in any direction, side to side or up and down, and raise or lower the shooting height.  The advantage of the gimbal head over a “monopod head” is that with a gimbal the lens remains balanced even when the control knobs are loose.   Hold the monopod with one hand, and your lens doesn’t flop forward or backwards as it would with an unlocked “monopod head.”  With the gimbal mounted on a monopod you’re always ready to shoot.

Yes, I know this seems unconventional, but just try it to see if it works for you.  And by the way, I absolutely love the “new” Nikon 600mm FL lens…in my estimation the sharpest long lens I’ve ever used.

TWO LONG EXPOSURE TIPS

Just a couple of quick tips relating to long exposures….

When using an ND filter, paired with a low ISO value, it’s often difficult to get a meter reading.  A standard solution is to crank up the ISO, take a meter reading, and then count stops back to the desired ISO.  For example, suppose you want to shoot at ISO 100.  Change the ISO temporarily to 6400:  1 second @ ISO 6400 = 2 seconds @ ISO 3200 = 4 seconds @ ISO 1600 = 8 seconds @ ISO 800 = 16 seconds @ ISO 400 = 1/2 minute @ ISO 200 = 1 minute @ ISO 100.

A shortcut I’ve used for a long time is to think of this in a slightly different way.  The time in seconds at ISO 6400 is the same numerical value in minutes at ISO 100.  1 second @ ISO 6400 = 1 minute @ ISO 100.  10 seconds @ ISO 6400 = 10 minutes @ ISO 100.  1/4 second @ ISO 6400 = 1/4 minute @ ISO 100.

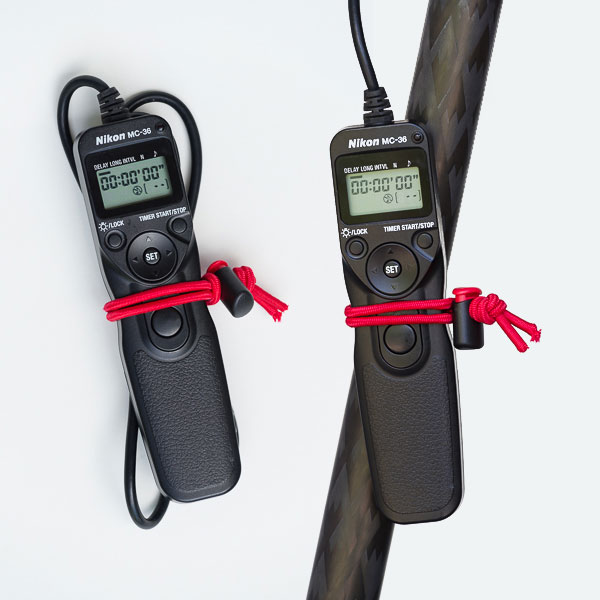
Most cameras offer 30 seconds as the longest timed shutter speed.  After that you have to use an intervalometer shutter release such as the Nikon MC-36.  These things have long cords, so how do you keep one from blowing around in any breeze while it’s dangling from your camera running a long timed exposure?  For that matter, what’s a good way to control that cord in a camera bag?  My solution is this:  http://www.thinktankphoto.com/products/redwhips.aspx, basically a thin bungee cord and a cord lock.  You can easily make these yourself, but I admit being partial to ThinkTank’s red ones (easier to find when dropped).  Here’s a composited illustration, showing the MC-36 ready to pack, and attached to a tripod leg.

Two uses for ThinkTank’s cable ties.