The Edge of Light

We photographers like to work early and late in the day.  For many people, getting up early – really early – is difficult (to say the least!).  Luckily, I’m pretty much a morning type person.  As far as I’m concerned, 9:00 PM is almost the middle of the night.

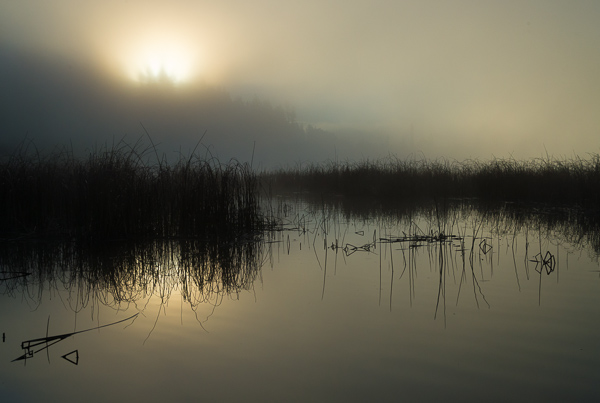
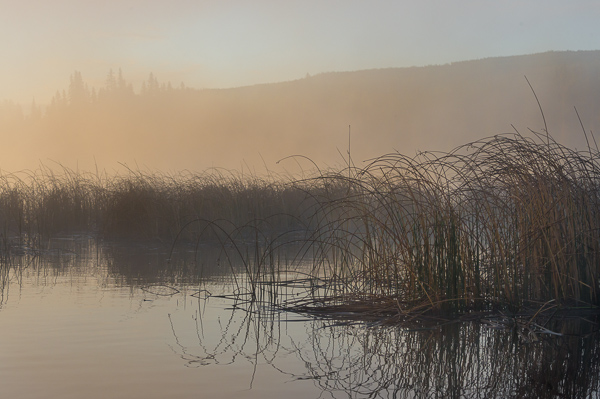
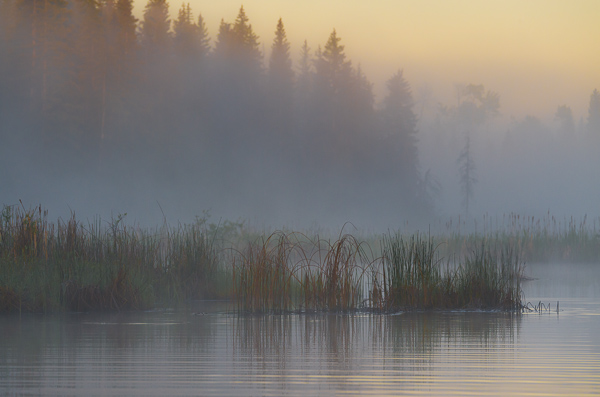
Here are three frames, taken a week ago, at about 5:00 AM.  These are from a small lake I’ve been working.  All three frames were shot from the same location, with my Nikon D4 handheld at ISO 1600, and the new Nikon 80-400mm lens.  Just in passing, I’m very impressed with this lens, to the point that I’m thinking about selling my Nikon 200-400mm f/4 if anyone’s interested.



Adobe Creative Cloud

If you’re a Photoshop user, you’ve undoubtedly heard about the Adobe announcement that from now on all new versions of Photoshop will be by subscription only.  You download the software, and it resides on your computer, but if you don’t pay the subscription fee the software deactivates.  Potentially this means that you might not be able to access your images.   Subscribe for a while, save a master layered image, and only by paying the subscription fee can you get back in to work with that layered file.  Yes, it’s on your computer, but of no use.  In short, it seems to me you have two choices:  (1) pay the subscription fee, and keep paying it forever, even with price increases; or (2) stick with PS CS6, the current version which you can purchase outright.  The problem with (2) is what happens if you buy a new camera, not supported by CS6, or get a new computer with a new operating system on which CS6 will not run?  You could keep your current gear, but I for one am certainly not at the point of saying that the cameras and computers I presently own are my final cameras and computers.

Adobe has different pricing schemes, and for those who use multiple Adobe products the cost per month makes some sense.  But I don’t.  I use Photoshop, and occasionally InDesign, and the latter is an older version which I have no plans to upgrade.

Like many, I’m not happy about Adobe’s decision.

But…there is a small glimmer of hope, especially if you’re a Lightroom user.  Lightroom was designed specifically for photographers, while Photoshop was not.  Here’s a long forum piece which in my opinion is well worth a read:

http://www.luminous-landscape.com/forum/index.php?topic=78240.0

In case you don’t know the players, Thomas Knoll is the original creator of Photoshop, Eric Chan is the chief engineer on Adobe Camera Raw, and Jeff Schewe is a photographer/developer closely connected to Adobe.


Professional Photography

Marissa Mayer is the CEO of Yahoo, and Yahoo owns Flickr, the popular photo website.  Referring to changes at Flickr, she commented:  “…there’s really no such thing as professional photographers anymore.”

Really?  Guess I didn’t get the memo telling me I was no more. 

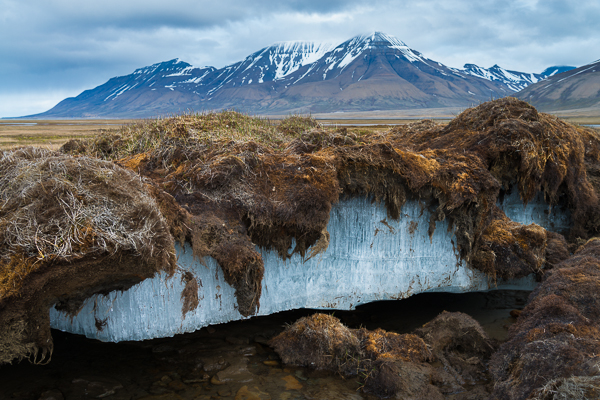
Permafrost.

For Earth Day, 2013.

Permafrost, exposed and melting. Near Longyearbyen, Spitsbergen.

10 Photoshop Tips

1.  To tone down the whites in an image, select them using Color Range.  Add any adjustment layer, and change the layer blending mode to either Multiply or the slightly stronger Linear Burn.  Then drop the layer opacity to taste.

2.  When shooting frames for a panoramic, manually setting camera exposure is more precise than using an autoexposure mode.  Use the middle of the panoramic scene to set the base exposure.  If you’re shooting RAW files, you can leave white balance (WB) set to Auto.  When processing the files in Adobe Camera Raw, or Lightroom’s Develop module, select one image and drag the WB slider from the “as shot” position to a distinct number.  Now sync all the other frames to that WB.

3.  Make a preset to rename your files in Bridge or Lightroom based upon the capture date.  When you travel, reset the clock in your camera to the local time zone.  This way, all your image captures will match up with your itinerary and there will be no confusion as to location.  Just remember to reset the clock when you get home.

4.  Photoshop’s Ctrl/Command+Z undoes the last step you’ve taken.  But using it immediately a second time simply undoes the undo you just made.  To step backward more than once, use Alt/Option+Ctrl/Command+Z.

5.  When preparing an image for printing, as the final step add a 3 pixel black hairline around the perimeter to define the edge.  Three easy ways to do this:

  • Select the entire image, Ctrl/Command+A.  Then do Edit > Stroke, and set pixels to 3, the color to black, and the location to Inside.
  • With the image layer unlocked, add a Layer Style, Layer > Layer Style > Stroke (or click on the fx icon at the bottom of the Layers Palette).  Set pixels to 3, Position to Inside, and color to black.
  • Increase the canvas size, Image > Canvas Size.  Select pixels for the unit of measurement, 3 for the number of pixels, black for the color, check the Relative box, and make sure the middle square is the anchor position

6.  Opening several similar images as layers in Photoshop (from either Bridge or Lightroom) aligns the outer dimensions of the images.  To align the contents, select all the layers, and then do Edit > Auto-Align Layers.

7.  Make a brush to add your name and copyright to images.  Make a new white document no larger than 2500 pixels long dimension.  Add the copyright symbol and your name.  Then do Edit > Define Brush Preset.  For a signature brush, write your name on white paper using a black marker, photograph it (jpeg, small, fine), and size the image to no larger than 2500 pixels.  Using Image > Adjustments > Levels clip the image to pure white and pure black.  Save as a brush, Edit > Define Brush Preset.  If you use either of these brushes on a new layer, you can add Layer Styles (drop shadow, etc.) to that layer.

8.  Caps Lock toggles the cursor display — for example, from standard to precise.

9.  Use the often overlooked Image Processor (from Bridge: Tools > Photoshop > Image Processor) to quickly create new file types.  Select the images, choose an output location, select the file type you want, specify the quality and size, and click Run.

10.  When making selections, remember that the “marching ants” only show pixels that are at least 50% selected.  Outside of the “ants” are pixels that are also selected, just at a lesser amount.


These tips originally appeared as part of an article I wrote for Photoshop World magazine.

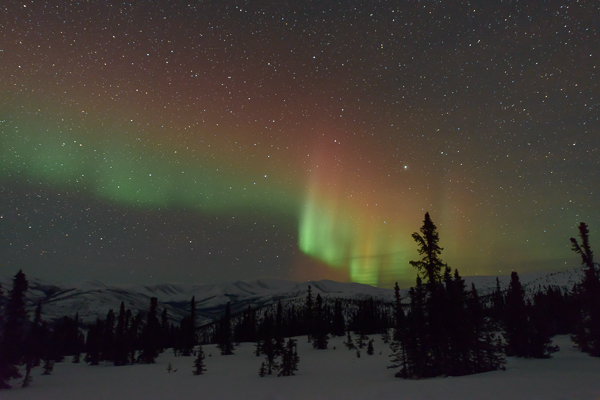
Aurora Borealis

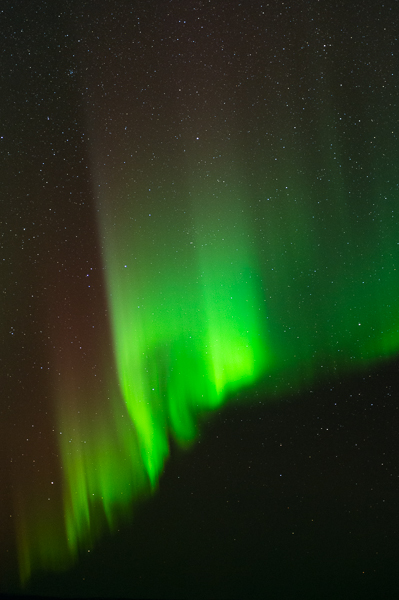
Shortly after the Tucson workshop, I traveled to Fairbanks, Alaska, to photograph the aurora borealis, the northern lights.  The last time I shot the aurora I was using film…digital cameras were still in there infancy.  And what a difference digital makes!  On this trip I used both my Nikon D4 and D800E, at shutter speeds between 6 and 20 seconds with the 14-24mm and 24-70mm lenses wide open at f/2.8, and ISOs of 1600, 2200, and 3200.

The northern lights, the aurora borialis.


The northern lights, the aurora borealis.


ELEVEN FALSE STATEMENTS

1.  Images for the web should be sized at 72 dpi.  First of all, “dpi” refers to dots per inch, and computer screens have pixels, not “dots.”  But “72 ppi” is also false.  Pixels dimensions are the only criteria for computer images.  1200 pixels are 1200 pixels, whether they be 1/inch or 1200/inch.  You still have 1200 pixels.  Say you have an image that’s 1000 x 500 pixels at 72 ppi.  How many total pixels is that?  1000 x 500 = 500,000.   Resize to 1000 x 500 pixels at 300 ppi.  How many total pixels is that?  1000 x 500 = 500,000.  Exactly the same.  If you’re resizing web images to 72 ppi, you’re simple adding a useless step to your workflow.

2.  Mac monitors use 72 ppi while Windows ones are 96 ppi.  Sorry, this is a myth.  If it were true, a monitor would have to change resolution depending on whether it was connected to a Mac or a PC.  Want to know roughly what the resolution of your monitor is in ppi?  Measure the horizontal width of the screen and divide this into the horizontal pixel dimension at the monitor’s native resolution.  My laptop’s screen is 1920 pixels wide, and measures about 13.5 inches horizontally.  1920/13.5 = about 142 ppi.

3.  You should set Adobe RGB in your camera if you’re shooting RAW files.  While this might affect the image displayed on the camera’s LCD, it does not directly affect a RAW file.  After all, if Adobe RGB were actually applied, the file would no longer be RAW data.

4.  For the best RAW file results, set a specific white balance in the camera.  Don’t use Auto White Balance.  RAW files have no white balance.  Just as I said above, if a white balance were applied the file would no longer be RAW.  A specific white balance is only set when the file is processed into a standard graphic file format such as .psd or .tiff or .jpeg; that is, when it is no longer a RAW file.

5.  This RAW image is how it appears right out of the camera.  Not true.  A RAW image has to be rendered in some way before you can even see it.   Exactly how it is rendered depends on the default settings of the RAW conversion software you use.

6.  You can evaluate exposure by looking at the image on the camera’s LCD.  You can adjust the LCD’s brightness on almost all DSLRs, so exactly which level of brightness would be “correct?”  Sorry, not true at all.  For that matter, the camera LCD most certainly is not a color corrected and calibrated monitor.  You can evaluate composition; you cannot evaluate color or exposure.  You definitely should use the histograms for exposure information.

7.  Always use a UV filter to protect your lens.  From what?  Dirt and fingerprints?  Then you must take the filter off for every shot, otherwise you’re shooting through a dirty, fingerprinted filter.  Use one for “protection” only if you can state from what it is you’re protecting the lens.  Salt spray?  Yes, this might be an answer, but I live about 100 miles from the ocean and on the other side of a mountain range, and if there is salt spray here, protecting my lens will be the least of my worries.

8.  12 frames/second is better than 10/frames per second.  In what way?  Neither one guarantees you’ve caught the peak moment.  Consider this:  let’s assume a shutter speed of 1/1000 second.  12 frames/second captures 12/1000 of the action, and misses 988/1000 of it.  Holding down the shutter button at the highest frame rate yields lots of images, but not necessarily the one you wanted.

9.  Always underexpose a half-stop to richen the colors.  Intentional underexposure with digital cameras is one of the worst things you can do.  It simply adds noise.

10.  Professional photographers get all their equipment free from the camera manufacturers.  Boy, do I ever wish this were true, but it isn’t.   For that matter, I wish it were true for cars and houses also.

11.  All information on photography forums is true.  You might remember back when there was an actual discussion about using Scotch® tape to clean camera sensors.  I’m fairly sure someone fell for this, and actually tried it.  We all know that it’s not Scotch® tape you should use, but duct tape, right?  (Well, I read about using duct tape on the Internet, so it must be true.)

ETTR TO THE FAR RIGHT

If you’re a RAW shooter you should already know about ETTR, Expose to the Right.  The theory behind ETTR is that the best image capture for the most possible information is when the histogram is pushed to the right, to the “bright” side.  Just keep adding exposure until that histogram is over to the right side of the graph.

OK, but how far to the right?  You definitely don’t want to clip the highlights.  DSLR cameras have a clipping warning display, the “blinking highlights,” or “blinkies” as they are commonly called, which shows up on the camera’s LCD.  Many cameras will even display the blinkies for each individual color channel, besides the composite luminosity.  But remember that the image displayed on the LCD is not the actual RAW file; it’s a jpeg thumbnail created on the fly by the camera.  Camera manufacturers have coded in some headroom with the blinkies, as they don’t want customers to be angered at blown out highlights.

Fine.  But I would suggest running a test to determine exactly what the correlation is between when the blinkies start, and the actual clipped highlights in the RAW file.  You can easily run a test to determine this.  Set your camera to Aperture Priority, lock it firmly on a tripod, and aim at any scene.  Increase exposure until the first blinkies appear.  Note this frame (probably the easiest solution would be to delete any previous frame you shot to get to this point).  Now shoot several more frames, using  Auto Compensation to add 1/3 stop to each successive frame.  Open this series in your RAW file software, such as Lightroom or Adobe Camera Raw, turn on the clipping warning in the software, and check each frame.  I’ll bet that the starting frame, the one the camera blinkies said was clipped, is actually not clipped at all.  In fact, you might be surprised at just how much headroom you have.  With my particular Nikon D800E and a medium toned test subject, I have to add 1.3 stops beyond the blinkies before the RAW file has clipped highlights.

So what’s the point of doing this?  Why worry?  Well, with digital capture, noise lives in the dark exposures.  If you want the best possible data, start with the best possible exposure.  With my particular camera I’ll add some extra exposure whenever the subject is such that I can, especially when working at higher ISO values where noice is always a problem.  Recently I shot a landscape at ISO 1600.  I shot at both the metered ETTR exposure, and at my “extra 1.3 stop” ETTR settings.  The difference was remarkable.  The first image needed noise reduction.  When I looked at the second shot, the one when I had added 1.3 stops, the image on the LCD appeared almost washed out.  But when I reduced the exposure in Lightroom (my standard RAW file software), all the noise was gone.  In fact, my tests suggest there is even a slight difference when the camera is set at base ISO 100, where I use the camera the most.

Does this really matter?  The answer depends on how compulsive you are about quality, the realities faced in the field, and on how the photograph is to be used.  Just remember, ETTR is for RAW capture only.  And  you don’t want to lose an image by blowing out the highlights.  There are indeed some scenes with the highlights already maxed out.

Once you know how the blinkies in your camera correlate to the actual RAW histogram, a simple and safe solution — particularly for static subjects such as landscapes — is to set your camera to bracket another  frame that is 2/3 stop more exposure than the ETTR histogram on the LCD.  When I shoot with my D800E, I know that I’ll be adding that extra bit of light whenever I can.


Lightroom & Camera Raw

I recently received an email with a question about processing an image in Lightroom.  When the same image was opened from Bridge into Camera Raw, none of the Lightroom work was applied.  This question has come up before, and there seems to be quite a bit of confusion over what is happening.

Any time you make a change to an image in Lightroom, that information is saved only in Lightroom’s catalog.  It’s not part of the file.  The solution is simple:  after working on a photo in Lightroom, save the final metatdata settings to file (and all edits in Lightroom are metadata edits).  Select the photo or photos you have worked on, and do Ctrl/Command + S.  You can now open an image from Bridge into Camera Raw or Photoshop, and they can see what you’ve done in Lightroom.

You could select Automatically write changes into XMP in Lightroom’s Catalog Settings, but I suggest not to do so, as this has to record every edit you make.  Move any slider from 0 to 1, and then move it to 2, then back to 1, and finally back to 0, and all four of these moves have to be recorded…but in terms of the image nothing at all has happened.  Ctrl/Command +S (menu item: Save metadata to file) saves the summation, which is the only thing that matters.

Suppose you work on an image in Lightroom, and then choose “edit in Photoshop” to finalize the image.  When you’re finished working in Photoshop you select either “save” or “save as,” and the image is returned into Lightroom’s catalog and all is happy.  Lightroom knows what you have done in Photoshop.

But what happens when you do not start from Lightroom?  Use Bridge to open an image that is already in Lightroom’s catalog, make some edits in either Camera Raw or Photoshop, and then save the image…but now Lightroom doesn’t know what you have done.  When you next open Lightroom, the image will be tagged with a small badge, indicating that settings have been changed outside of Lightroom.

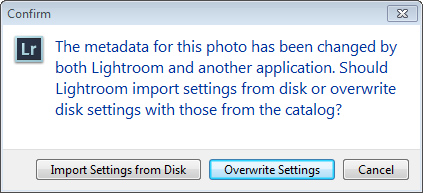
Click on the badge, and this message box appears:

So, what do you want to do?   If you want Lightoom to show what you did in Camera Raw or Photoshop, click on Import Setting from Disk.  If you want to to keep the Lightroom settings as they were, click Overwrite Settings.

Reader survey questions

I’m in the earliest stage of thinking about doing a couple more eBooks.  I’m open for ideas and concepts.  My thoughts at this time:

1.  A “coffee table” photo eBook — large photos, not much text — on one of these topics:

(a) Antarctica.

(b) 50 of my all time favorite digital images.

(c) five of my favorite photo destinations.

(d) some other subject?

2.  A “teaching” eBook on:

(a)  digital topics:  exposure, reading a histogram, RAW capture, tilt/shift lens use, digital ISO advantages, etc.

(b) 25 digital images: how and why they were shot, and how processed.

(c)  the elements of composition:  line, color, texture, etc.

(d) some other topic?

I’m open for suggestions.  Let me know your thoughts (but no guarantee that I’ll actually write anything at all!).  Thanks in advance for your responses.


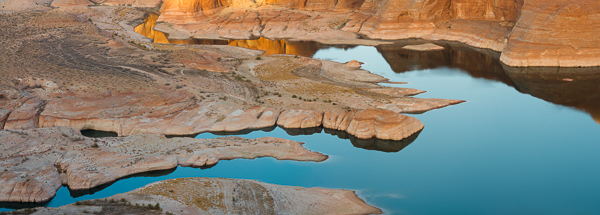
And here’s a stitched panoramic image from the trip I mentioned in my last blog post.  Three horizontal frames, Nikon D800E, 70-200mm lens.

Lake Powell, Utah